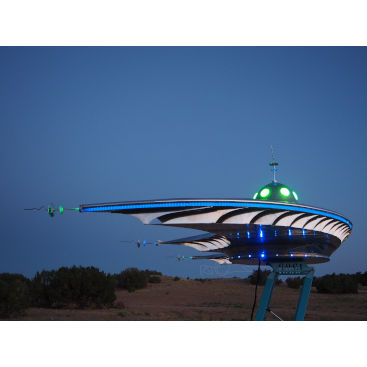
Spaceship sculpture
A flying saucer sculpture titled 6061 is for sale. 6061 has been selected to be part of the Southwest Artists Series Purchase Initiative, and is listed in the NM Art in Public Places catalog (1% for Art Program) for municipalities. It is also available for private purchase. Contact Bob Davis via Facebook Messenger, or email rtdavisartist at gmail.

The Vision
6061 is named for the very tough aluminum alloy that the spaceship is made from, 6061-T6 (pronounced sixty-sixtyone-tee-six by us metal heads,) and the Chevy pickup trucks that were made in 1960 and ’61 that have the cool nostril thing going on with the hood.
Retrofuturism
The future in 1960 looked way different than it did in 1950. Stuff had been figured out—not necessarily worked out, but for real and well under way, like rockets, nuclear reactors, transistors, computers, jet aircraft. It was a time when science and engineering seemed powerful and limitless. Hey, y’all, let’s put a man on the moon! There were at that time things that were known and well explained, but also things that were known and yet unexplained, and things that were unknown and unexplained. The future was bright absent an all-out nuclear exchange, but looking into the future is like driving in fog—you can’t say with accuracy how far you can see. It is fair to say, looking back, that all those alive and looking into the future from 1960 did not have the slightest idea what 1968 was going to be like, let alone 2020. This sculpture, 6061, is here to help put you for a moment into the sneakers of those of us who were kids in 1960, to feel for a moment the bright future of the time, and also the depth of the unknown and the unexplained that lay before us.
Visit the 6061 Photo Gallery

The Process
So you want to build a spaceship out of aluminum and mount it on a new-looking 1960 truck? With a lift and fancy lights that blink? Wings that fold up so you can drive it around?
Oh my. Had I known in advance the level of difficulty in making an all aluminum spaceship, and finding and rebuilding an old chevy truck, I might have gone for something a little easier. Looking back on it I can say I learned a heck of a lot, and I am so proud of myself for sticking with it and getting it done. This was HARD.
The spaceship
I wanted to weld the spaceship together (there are other ways) because I wanted the aluminum welding experience, and I wanted it to look like it might have been made by some guy in his garage, which is essentially true, instead of being produced by some fancy aircraft plant. To make the bottom finned sections, which I call the Space-time Compressor, I had to figure out a way to plug-weld thin aluminum. Plug-welding is where you drill a hole and weld through the hole to a piece of metal below the hole, and weld the hole’s edges to the metal below, tying the two together. You do this when you are too big to get in the spaces where you might otherwise make a weld. This works great with steel, but does not work at all with thin aluminum. The hole gets bigger by melting, and the bottom piece never welds to the hole’s edges. It took a while, and I won’t go into the details here, but I figured out a way to plug-weld thin aluminum sheets. There was some cussing involved.
All of the curved sheets of metal have to be shaped—gently stretched to a curved shape—somehow; you don’t get to just wrap it on and weld it down. Metal shaping is an art all by itself. I had shaped metal in the past, but very rare was the project that needed nice, smooth, curved shaping. Part of this project was an exploration of metal shaping using old-school methods. The leading edges of the ship were formed an inch at a time in a home-made bender with bending force provided by a hydraulic bottle jack. The thin sheets were shaped using an English wheel, a thing that looks like the world’s biggest C-clamp that pinches the metal between two steel rollers, or wheels. Shaping metal this way is called wheeling, and it is a severe mind-game. You begin by forming a complex strategy in your mind to get the shape you need. You must remember all the ways the wheel can stretch and shape metal while working the sheet back and forth through the two pinched together rollers without pinching your fingers with the rollers, AND remember your strategy for getting that shape you want. It feels like performing a complex task while looking in a mirror. I’m not as good at this as I’d like to be, but at least I’m not in kindergarten any more.
The truck
I was very fortunate to find a 1960 Chevrolet pickup in nearly drivable condition in Chama, NM. She had dings and dents and car cancer, but very solid overall. I had a mobile sandblaster come and blast all the paint and old body filler off the exterior. I then straightened out the dents using similar strategies to those used with the English wheel, but different tools—except where I cut out body panels and made new ones to weld in, and I did use the wheel to form these. Once I replaced the rusted out bits with new metal and fixed the dents, I applied new body filler and sanded it smooth. Then the primer and then the paint. The mechanical work on the truck was nothing major, but a whole pile of details like getting the brakes and clutch to work, repairing the electrical system, adding seatbelts. I think it was the twenty-fifth time I took the carburetor off that I finally got it to work right.
I think the absolute most difficult part of this project was the level of dithering involved. Trying to decide how picking one method or another and proceeding with it will limit my choices down the road, and lock me into a path that may not be the best one—this is the essence of dithering. And, there are always multiple, braided threads to dither over. This project more than any other has helped me to embrace dithering as just another aspect of my way of doing things. I will strive to become an even better ditherer.
Also visit the 6061 Photo Gallery